4D Write Pro Interface
4D WritePro Interface offers a set of palettes, which allow end users to easily customize a 4D Write Pro document.
A 4D developer can easily implement these palettes in their application. Thus, end users can manage all 4D Write Pro properties, such as fonts, text alignment, bookmarks, table layout, and frames.
The main 4D Write Pro Interface documentation can be found in the 4D Design Reference manual.
You will find below:
- the Table Wizard configuration documentation,
- the integrated A.I. documentation.
Table Wizard
The Table Wizard is here to further simplify table creation based on database data using contexts, data sources, and formulas.
The Table Wizard, accessible to end-users, loads templates provided and configured by 4D developers. This enables developers to customize the template according to the specific use cases and business requirements of the users.
The Table Wizard comes with default templates and themes, which developers can configure to adapt its content to match the specific requirements of the application.
To implement the Table Wizard in your application, the developers are able to create and configure template files.
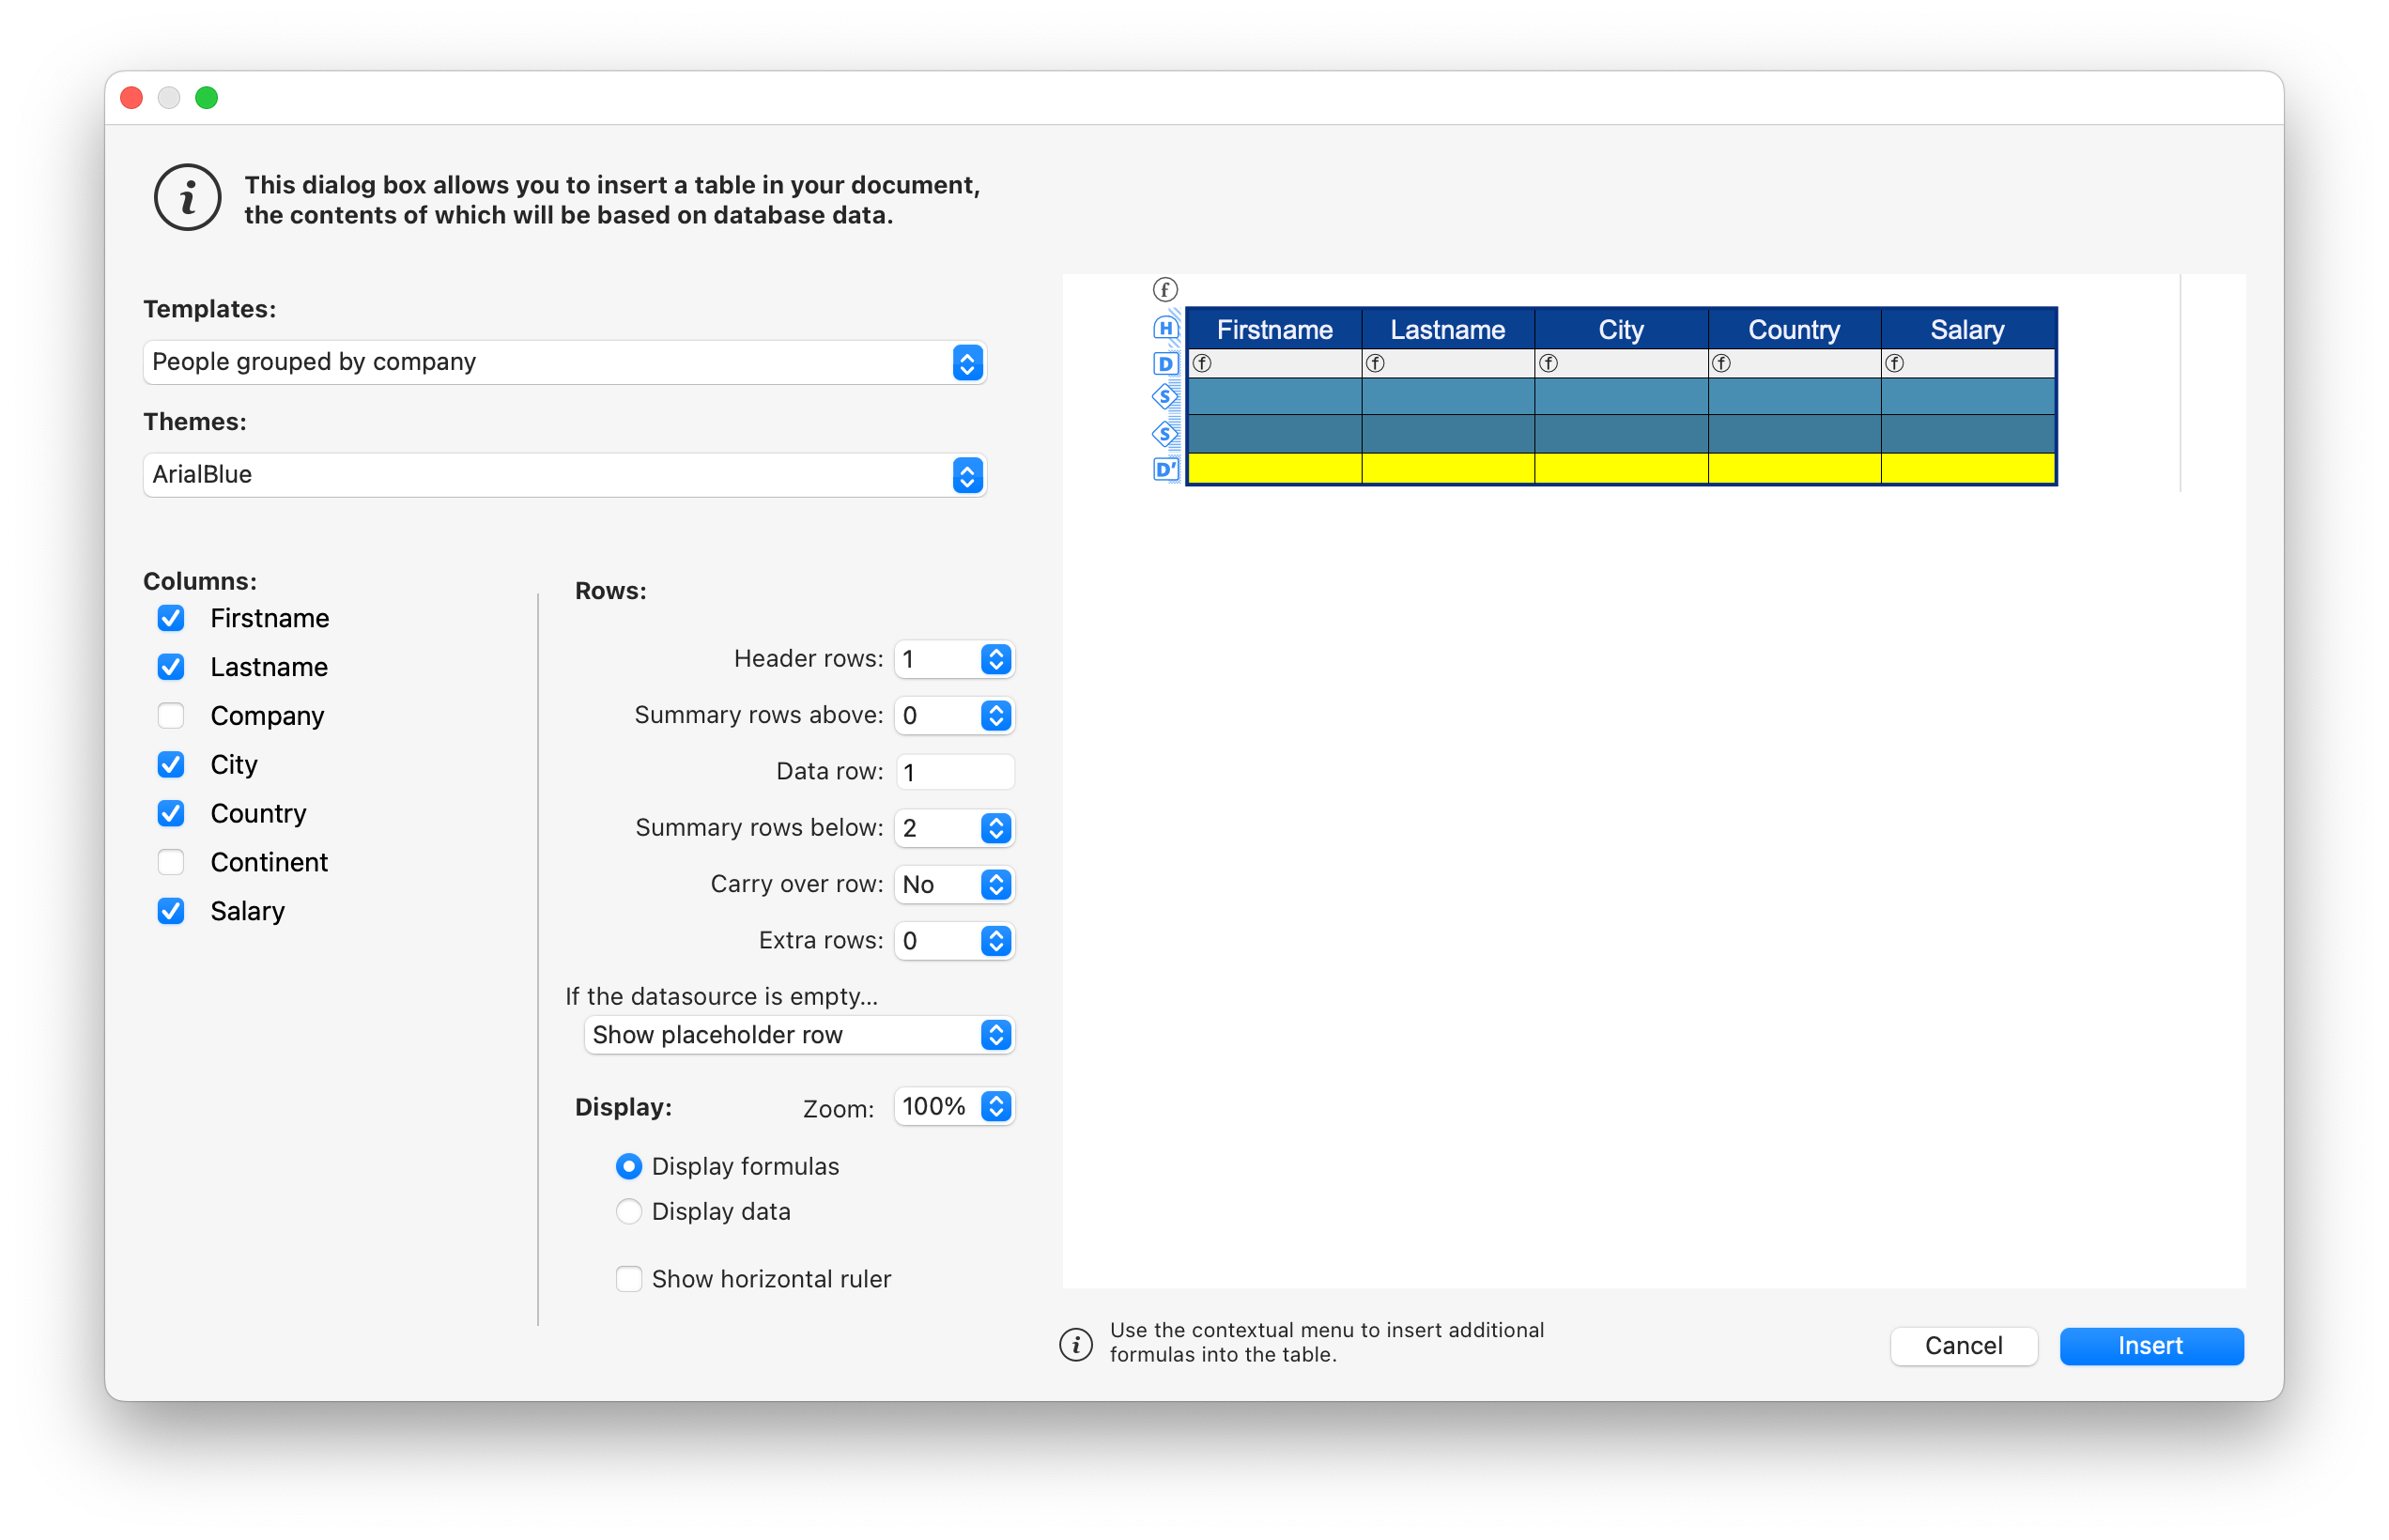
WP Table Wizard interface
The user opens the Table Wizard dialog from the "Insert table" menu item in 4D Write Pro interface toolbar and sidebar.

From this interface, the user can select a template or a table from the first drop-down list and a theme from the second.
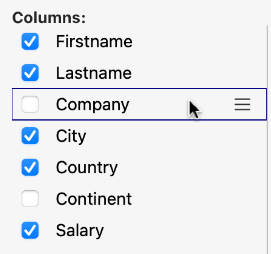
In Columns:
Depending on the user's selection of a template or a table, the user can view the list of fields stored in the template (Blob and object types are automatically excluded). They can then select columns to display in the table by checking the box in front of the field name and order them by moving and dragging the fields list.
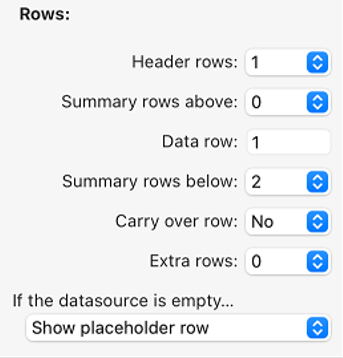
In Rows:
In the Table Wizard, the user can also define the number of header rows and extra rows (0 to 5 each), set break rows (summary rows) above or below the data row, and choose to show/hide carry-over rows.
In addition, the user has the possibility to choose the table's behavior when its datasource is empty with the following options: Show data row, Hide date row, Hide table, Show placeholder row.
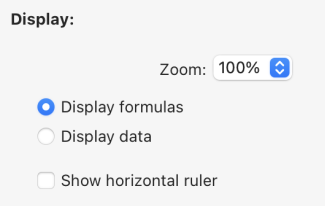
In Display:
The user adjusts the zoom level according to their preference by selecting the desired option from a drop-down list, uses radio buttons to display formulas or data for clear presentation, and chooses to display a horizontal ruler using a checkbox.
After finalizing the table creation and customization, the user can click on the Insert button to add the table to their WP document.
Once the table has been integrated into the document, the user can customize its style. The formatting tools of the toolbar and sidebar are still available.
WP Table Wizard template configuration
The templates configuration includes:
- Defining tables and fields as well as preparing formulas adapted to the application from the template file.
- Translating table, field, and formula names from the translation file.
- Designing graphic styles and customized themes from the theme file.
These three types of files contribute to the configuration of the Table Wizard, and while each serves a distinct purpose, none of them are considered essential components.
Template files
The template file allows you to define the following:
- the formula that returns an entity selection used as the table's data source,
- the break formulas (if any break row can be inserted)
- the dataclass attributes that can be used as table columns,
- the formulas available as contextual menus inside break rows, carry-over row, placeholder row or extra rows.
The template file must be stored in a "Resources/4DWP_Wizard/Templates" folder within your project.
The template file in JSON format contains the following attributes:
| Attribute | Type | Mandatory | Description |
|---|---|---|---|
| tableDataSource | Text | x | Formula of table data source |
| columns | Collection | x | Collection of table columns |
| columns.check | Text | x | True when the column is already checked in the template editor. False when the column is unchecked in the template editor. |
| columns.header | Text | x | Label shown to the user |
| columns.source | Text | x | Formula |
| breaks | Collection | Collection of break objects. The order of the breaks is important. It corresponds to the order in the document when the breaks are above the data lines. | |
| breaks.label | Text | x | Label shown to the user |
| breaks.source | Text | x | Formula |
| breakFormulas | Collection | Collection of formula objects applicable to break rows | |
| breakFormulas.label | Text | x | Label shown to the user |
| breakFormulas.source | Text | x | Formula |
| bcorFormulas | Collection | Collection of formula objects applicable to bottom carry over rows | |
| bcorFormulas.label | Text | x | Label shown to the user |
| bcorFormulas.source | Text | x | Formula |
| extraFormulas | Collection | Collection of formula objects applicable to extra rows | |
| extraFormulas.label | Text | x | Label shown to the user |
| extraFormulas.source | Text | x | Formula |
| placeholderFormulas | Collection | Collection of formula objects that are inserted in the placeholder row |
If your application is likely to be run on a 4D with language set to French, make sure that you use tokens in your formulas so that they are correctly interpreted no matter the user's language configuration.
Example
Here's a brief example of what your JSON file might look like:
{
    "tableDataSource": "ds.People.all().orderBy(\"toCompany.name asc, continent asc, country asc, city asc\")",
    "columns": [{
            "check": true,
            "header": "Firstname",
            "source": "This.item.firstname"
        }, {
            "check": true,
            "header": "Lastname",
            "source": "This.item.lastname"
        }, {
            "check": true,
            "header": "Salary",
            "source": "String(This.item.salary;\"###,###.00\")"
        }
    ],
    "breaks": [{
            "label": "Company",
            "source": "This.item.toCompany.name"
        }
    ],
    "breakFormulas": [{
            "label": "Company",
            "source": "This.item.toCompany.name"
	}, {
            "label": "Sum of salaries",
            "source": "String(This.breakItems.sum(\"salary\"); \"###,###.00\")"
        }
    ],
    "bcorFormulas": [{
            "label": "Sum of salaries",
            "source": "String(This.tableData.sum(\"salary\"); \"###,###.00\")"
        }
    ],
    "extraFormulas": [{
            "label": "Sum of salaries",
            "source": "String(This.tableData.sum(\"salary\"); \"###,###.00\")"
        }
    ]
}
Translation files
Translation files translate the names of templates, themes, tables, fields, and formulas. These files are added to the "Resources/4DWP_Wizard/Translations" folder in your project.
Each translation file must be named with the corresponding language code (for example "en" for English or "fr" for French).
The translation file in JSON format contains the following attributes:
| Attribute | Type | Mandatory | Description |
|---|---|---|---|
| tables | Collection | Collection of translated table objects | |
| fields | Collection | Collection of translated field objects | |
| formulas | Collection | Collection of translated formula objects | |
| fileNames | Collection | Collection of translated fileName objects (applicable to the theme and template name) |
Whitin each one of these attribute, the translation object includes the following attributes:
| Attribute | Type | Mandatory | Description |
|---|---|---|---|
| original | Text | x | Original text intended for translation |
| translation | Text | x | Translated version of the original text |
Defining these attributes within the translation object ensures proper organization and alignment between the source and translated content.
If the template name or the formula (break, carry-over row, or extra) exists in the translated file, its translation is applied in the Table Wizard. In addition, only the table defined within the translation file is displayed and translated.
The translation file serves an additional role when a user selects a table in the interface. It can filter the tables and fields proposed to the user. For example, to hide table IDs, this behavior is similar to the SET TABLE TITLES and SET FIELD TITLES commands.
Example
{
    "tables": [{
            "original": "People",
            "translation": "Personne"
        }
    ],
    "fields": [{
            "original": "lastname",
            "translation": "Nom"
        }, {
            "original": "firstname",
            "translation": "Prénom"
        }, {
            "original": "salary",
            "translation": "Salaire"
        }, {
            "original": "company",
            "translation": "Société"
        }
    ],
    "formulas": [{
            "original": "Sum of salary",
            "translation": "Somme des salaires"
        }
    ]
}
Theme files
A list of themes is provided by default in the 4D Write Pro Interface component, such as "Arial", "CourierNew" and "YuGothic", available in multiple variations like "Blue" and "Green". However, you can create your own theme by placing it in the "Resources/4DWP_Wizard/Themes" folder within your project.
The theme file in JSON format contains the following attributes:
| Attribute | Type | Mandatory | Description |
|---|---|---|---|
| default | Object | Object containing the default style applicable to all rows. | |
| table | Object | Object containing the style definition applicable to the table. | |
| rows | Object | Object containing the style definition applicable to all rows. | |
| cells | Object | Object containing the style definition applicable to all cells. | |
| header1 | Object | Object containing the style definition applicable to the first header row. | |
| header2 | Object | Object containing the style definition applicable to the second header row. | |
| header3 | Object | Object containing the style definition applicable to the third header row. | |
| header4 | Object | Object containing the style definition applicable to the fourth header row. | |
| header5 | Object | Object containing the style definition applicable to the fifth header row. | |
| headers | Object | Object containing the style definition applicable to the header rows, if a specific header (like header1, header2...) is not defined. | |
| data | Object | Object containing the style definition applicable to the repeated data row. | |
| break1 | Object | Object containing the style definition applicable to the first break row. | |
| break2 | Object | Object containing the style definition applicable to the second break row. | |
| break3 | Object | Object containing the style definition applicable to the third break row. | |
| break4 | Object | Object containing the style definition applicable to the fourth break row. | |
| break5 | Object | Object containing the style definition applicable to the fifth break row. | |
| breaks | Object | Object containing the style definition applicable to the break rows, if a specific break (like break1, break2...) is not defined. | |
| bcor | Object | Object containing the style definition applicable to the bottom carry-over row. | |
| placeholder | Object | Object containing the default style applicable to the placeholder row. |
For every attribute used in your JSON file (header, data, carry-over, summary, and extra rows), you can define the following WP attributes, mentionned with their corresponding WP constant:
| WP attributes | Corresponding WP constant |
|---|---|
| textAlign | wk text align |
| backgroundColor | wk background color |
| borderColor | wk border color |
| borderStyle | wk border style |
| borderWidth | wk border width |
| font | wk font |
| color | wk font color |
| fontFamily | wk font family |
| fontSize | wk font size |
| padding | wk padding |
Example
{
    "default": {
           "backgroundColor": "#F0F0F0",
           "borderColor": "#101010",
           "borderStyle": 1,
           "borderWidth": "0.5pt",
           "font": "Times New Roman",
           "color": "#101010",
           "fontFamily": "Times New Roman",
           "fontSize": "7pt",
           "padding": "2pt"
    },
    "table": {
           "backgroundColor": "#E1EAF3"
    },
    "header1": {
           "textAlign": 2,
           "borderColor": "#41548F",
           "borderWidth": "1.5pt",
           "backgroundColor": "#979BA9",
           "color": "#F4F4FF",
           "font": "Times New Roman Bold"
    },
    "data": {
           "fontSize": "13pt",
           "textAlign": 0
    },
    "break1": {
           "textAlign": 2,
           "fontSize": "15pt"
    }
}
See also
4D Write Pro - Table Wizard (tutorial video)
Integrated AI
You can use an integrated AI in the 4D Write Pro interface so that you can easily translate or enhance your documents without having to use an external AI application.
Once you have enabled the AI feature, you can display a chat box over your 4D Write Pro document and interact with chatGPT to modify the text of the selection or of the document itself.
The 4D Write Pro interface uses OpenAI, for which you need to provide your own key (see below).
Limitations (Developer Preview)
In the current implementation, the feature has the following limitations:
- use of a predefined AI provider and necessity to pass your OpenAI key
- basic chatting features
- no image handling
- non-configurable predefined action commands
- predefined translations English/French and French/English only
Enabling the AI feature
The AI dialog box is available by clicking on a button in the 4D Write Pro interface. This button is hidden by default, you need to enable it explicitely.
To display the AI dialog box button, you need to:
- Get an API key from the OpenAI website.
- Execute the following 4D code:
WP SetAIKey ("<Your OpenAI Key>") //
No checking is done on the OpenAI key validity. If it is invalid, the chatGPT box will stay empty.
The A.I. button is then displayed:
- in the 4D Write Pro Toolbar, in the Import Export tab,
- in the 4D Write Pro Widget, in the Font Style tab.
Click on the button to display the AI dialog box.
AI dialog box
The 4D Write Pro AI dialog box allows a straightforward interaction between the chat area and the 4D Write Pro document.
Prompt area
At the bottom of the window, the prompt area allows you to enter any question to send to the AI.
To send your question to the AI, click on the Send button:
The button icon changes when the same request is sent again:
On the left side of this area, a pop up menu provides examples of common actions that can be usually delegated to the AI.
Selecting an action writes a corresponding question to the prompt. If necessary, you can modify the question and then to click on the Send button to actually send it:
Default translation actions are based upon the current 4D default configuration and depend on available languages.
Copy buttons
These buttons propose basic interactions between the chat area, the underlying 4D Write Pro document, and the clipboard:
- Return raw text/Return styled text: Copy the latest response or the selected response from the AI to the 4D Write Pro document at the current insertion point, replacing the selected text if any.
- Copy raw text/Copy styled text: Copy the latest response or the selected response from the AI in the clipboard.
In both cases, if the response was provided with styles, you can decide to copy the text with or without styles.
The chat box uses the Markdown language to format text. Basic styles such as bold, italic, underline, titles are supported. When pasting styled text from the AI in the 4D Write Pro area, you may lose some formatting information.
Chat area
The Chat area displays the whole interaction between you and the AI. You can scroll and select and part you want.
To empty this area, you can click on the Erase button of the History area (resets the window and all interactions).
History
The History area lists all your prompts sent to the AI. You can hide/show this area using the button on the top right corner of the Chat area.
The Erase button allows you to reset the whole window and erase all interactions. It is equivalent to close/reopen the AI dialog box.


