Structure editor
You use the Structure editor to manage the database structure — the tables and their relations. It gives you control over tables, table properties, fields, field properties including indexes, and table relations.
You can access the Structure editor by choosing the Database Structure command in the Design menu or by clicking on the Structure button  in the 4D toolbar.
The Structure editor provides a graphic view of a database’s structure as well as a toolbar and context menus that you can use to carry out database design operations. Each table is represented by a table image. It shows the fields and their types in the form of icons. An information bar displays the characteristics of tables and fields as the mouse moves over them.
A floating Inspector palette can be used to view and modify the properties of structure objects and of the structure editor itself. This window is described in the Inspector palette section.
Toolbar
The structure editor has a toolbar containing functions like the addition of objects, as well as navigation and display options:

From left to right, the icons perform the following actions:
- add objects (tables, fields, index, relations)
- search in editor
- hide/display tables according to folders defined in the Home page of the Explorer
- display filters
- Tools (size, alignment, sort)
- colors
- Index list window
- Primary key manager
Locking information
A closed lock icon  is displayed if the structure file is locked.
Locking can occur in both project and client/server modes when:
- The
catalog.4DCatalogfile is Read-only (Projects only). Clicking on the lock icon will display an alert to unlock it, if possible. - Two or more users attempt to modify the same structure at the same time. The structure cannot be used until the first user frees it by closing the window. (Client/server only)
In both cases, the structure can be opened in Read-only, but cannot be used until the lock is removed.
Information bar
The lower part of the editor window is an information bar displaying data corresponding to the area the mouse is over: table, field or relation.
Information about a table
- Table name and number
- Table triggers:
- NEW: On saving new record
- SAVE: On saving existing record
- DEL: On deleting a record
Information about a field
- Table name and number
- Field name and number
- Field type
- Field attributes:
- NUL: Map null values to blank values
- UNI: Unique
Information about a relation
- Origin table and field (many field)
- Destination table and field (one field)
- Relation type and ORDA name:
- N→1 (many to one) and
relatedEntitiesrelation attribute name - 1→N (one to many) and
relatedEntityrelation attribute name
- N→1 (many to one) and
For more information on ORDA names, refer to the Data Model Objects page.
Inspector palette
The properties of the Structure editor objects (tables, fields and relations) can be viewed and modified via the Inspector palette:
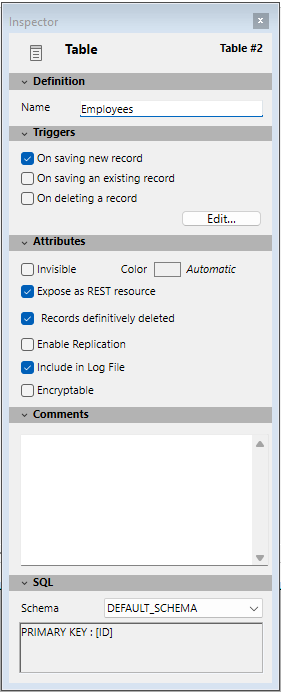
This palette appears when you double-click on an object. When it is displayed, its contents are updated dynamically depending on the objects selected. The Inspector displays the general properties of the Structure editor window when you click in an empty area of the window.
The different areas of the palette can be expanded/collapsed. You can click on the adjacent triangles to display or hide the corresponding information.
The following shortcuts can be used:
- Shift+click on the title bar of a collapsed panel expands that panel and collapses all the others.
- Alt (Windows) or Option (macOS) + click on the title bar of a collapsed panel expands all the panels.
- Alt (Windows) or Option (macOS) + click on the title bar of an expanded panel collapses all the panels.
The position of the palette and the expanded/collapsed states of its panels are saved.
Selecting an object
To work with an image of an object in the Structure editor, you must first select it. You can then specify its properties, move it, resize it, delete it, etc. You can select several objects of the same type simultaneously to modify their common properties in the Inspector palette.
To select:
- A table: Click the image of the table, or press
Tab/Shift+Tabto select each table successively. - A field or relation: Click the field or relation, or use the arrow keys to navigate.
- Several objects: Use
Shift+Clickfor adjacent objects,Ctrl+Click(Windows) orCommand+Click(macOS) for non-adjacent ones.
Working with table images
You can resize or move the table images in the Structure editor according to your requirements.
4D Server: In development mode, any modification in table images (resize, location...) is propagated to all developers in the Design environment.
Scrolling the field list
When you add fields to a table or when you reduce the size of a table, there may be more fields in the table than the image can display. When this happens, 4D automatically adds a cursor than you can use to scroll through the list of visible fields:

Resizing a table image
You can resize a table image to display more field names or reorganize your screen.
- Manual resizing: Simply click and drag the bottom of the table image or its lower right corner.

-
Optimal Size: This option automatically resizes the selected table(s) so that their size corresponds exactly to the number of fields they contain (no empty lines are displayed). To apply the Optimal Size command to one or more tables, select Optimal Size from the menu associated with the toolbar button of the editor or from the editor’s context menu (click on a table).
-
Collapse: The Collapse function collapses the selected table image(s) so that only their names are visible. This is useful for large structures.
To apply the Collapse command to one or more tables, you can:
- Select **Collapse** from the editor’s context menu (click in the title area of the table).
- **Shift+Double-click** in the table name area to toggle through the same sequence *original size → collapse.*
- A standard double-click on the table name area opens the Inspector.
- Alt (Windows) or Option (macOS) + double-click opens the trigger method of the table in the Method editor.
- Ctrl (Windows) or Command (macOS) + double-click opens the Explorer on the Form page.
Moving table images
You can move table images to regroup them according to function or to reorganize the Structure editor window. You can also align them to improve the readability of the structure. Any relations are redrawn automatically to correspond with the new table locations.
To move a table image manually, click on the name of a table and drag it using the mouse cursor. Drag the table name bar only. Dragging other parts of the table image may produce different effects, such as creating a new table relation or changing the size of the table image.
To align two or more tables, select the tables to align and choose an alignment option in the tools menu:

These commands are only active when at least two tables are selected.
Scrolling
Specific scrolling functions facilitate navigation among large structures:
- The mouse wheel can be used to scroll the contents of the editor window vertically. This will also scroll through the fields of a table when the cursor is placed above it.
- Holding down Shift while using the mouse wheel scrolls the contents of the window horizontally.
- Pressing Shift activates the "hand" tool which can be used to drag the entire contents of window by clicking in the empty area.
Zoom
You can modify the display scale of the database structure using the Zoom menu in the right side of the information bar. 100% is the default value when opening a database. Zoom action is focused on the selection if there is one.
The current zoom setting is specific to each user and is memorized when the window is closed.
You can configure the graphic rendering of the Structure editor during a zoom using a preference.
Object type display
The Display button in the toolbar of the Structure editor is associated with a menu and lets you choose the objects to be displayed in the structure according to their type:

By default, all objects are displayed. This feature allows various representations or views — from the simplest to the most complete — and provides an analysis tool for the structure based on the level of information required.
The choices are applied to all tables and fields. They are saved per user and memorized when the window is closed. Hiding objects does not change the position of the tables.
- When several types of fields are checked, a logical OR operator is used to determine the objects to be displayed. For example, if Invisible Fields and Not Indexed Fields are both checked, all the non-indexed and invisible fields (indexed or not) are displayed.
- Tables have priority over fields: if a table is not displayed, its fields are not displayed.
- If you add an object whose type is not displayed (table, field, or relation), it becomes visible. To hide it again, you must uncheck the corresponding option in the Display menu.
Highlight/dim tables by folder
You can hide groups of tables in the Structure editor based on folders defined in the Home Page of the Explorer window. You configure this display using the Folders button in the Structure editor toolbar.
The menu associated with this button displays commands that manage the display as well as the list of folders in the database. A check mark appears next to each folder displayed. You can modify the current display by selecting or deselecting a folder from this menu.
The Highlight All Folders and Dim All Folders commands can be used to display or hide all the tables in folders of the database.
Each click on the toolbar's folder button inverts the display of the tables: highlighted tables are dimmed and vice versa.
When the tables are dimmed, only their outlines appear in the Structure window. Tables that are not dimmed remain fully visible.
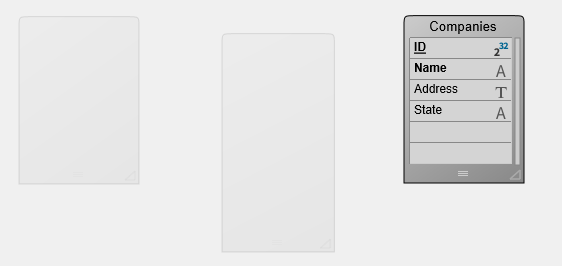
You can set the appearance of dimmed tables in the Structure editor to either Dimmed or Invisible using an option in the Structure page of the Preferences. It is necessary to close and reopen the Structure editor window for this preference to take effect.
Customizing the editor window
The Structure editor window has specific properties that can be set using the Inspector.
To display these properties, you can either:
- Double-click (or click, if the window is already displayed) in an empty area of the window, or
- Right-click in an empty area and choose Structure Properties from the context menu.
The Inspector palette displays the Structure properties.
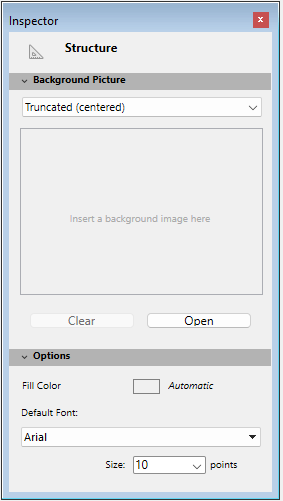
The following properties can be set:
- Background Picture: You can add or modifiy the background picture used as well as its display format. To add or modify the picture, click on the Open button or right-click in the preview area and choose Open from the context menu; then select the file containing the picture to be displayed. You can use any picture format. The selected picture is displayed immediately in the preview area and in the editor window. To change the display format of the picture, choose a value from the Picture Format menu. The formats provided are the standard picture display formats of 4D. To delete a custom picture, click on the Clear button or right-click in the preview area and choose Clear from the context menu.
- Fill Color: You can change the color used for the background of the editor window. To do this, click in the color selection area and choose a color from the selection menu.
- Default Font: To change the default font used for table and field names, choose a vaue from this menu. You can also use the Size menu to change the default font size.
Find in Structure
4D lets you carry out searches directly in the Structure editor window. Searches can be among the following elements:
- Table names and/or field names
- Table numbers
To perform a search, enter a text or table number in the Search field of the Structure editor. As you type, a bar appears below where you can specify search options:

- Scope: Tables & fields or Tables (i.e. tables only).
- Types:
- Contains (default): typing "le" finds "Table", "Letter", etc.
- Starts with: typing "pa" finds "paper", "paid", but not "repair".
- Number: typing "2" finds tables numbered 2, 12, 20, etc.
Searches are performed in real time as you type. Tables and fields that match are highlighted. If nothing is found, the search area turns red. To exit Search mode, click the X button in the search bar or delete all the characters in the search area.