4Dユーザー&グループの管理
マルチユーザーアプリケーションにおいて、4Dはユーザーに対して標準的なアクセス権と特定の権限を与えます。 ユーザー&グループシステムが起動されると、これらの標準的な権限が有効になります。
プロジェクトにおけるユーザー&グループ
プロジェクトアプリケーション (.4DProject および .4dz ファイル) では、シングルユーザーおよびマルチユーザー環境の両方でユーザーとグループを設定することができます。 ただし、アクセスシステム は 4D Server でのみ有効です。 次の表は、主なユーザーとグループの機能と、それらが利用かどうかを一覧に示します:
| 4D (シングルユーザー) | 4D Server | |
|---|---|---|
| ユーザーとグループの追加/編集 | ◯ | ◯ |
| ユーザー/グループにサーバーアクセスを割り振る | ◯ | ◯ |
| ユーザー認証 | × (すべてのユーザーがデザイナーです) | ◯ |
| デザイナーへのパスワード設定によるアクセスシステムの起動 | × (すべてのアクセスがデザイナーです) | ◯ |
シングルユーザー環境でのユーザー認証とアクセスコントロールについては、シングルユーザーアプリケーションのアクセスコントロール を参照ください。
デザイナーと管理者
最も強力なユーザーは デザイナー (Designer) です。 デザイナーは、アプリケーションに関するあらゆる操作をおこなうことができます。 デザイナーは次のことができます: デザイナーは、アプリケーションに関するあらゆる操作をおこなうことができます。 デザイナーは次のことができます:
- 制限なく、すべてのアプリケーションサーバーにアクセスする。
- ユーザーやグループを作成する。
- グループにアクセス権を割り当てる。
- デザインモードを使用する。 シングルユーザー環境では、常にデザイナーアクセス権が使用されます。 クライアント/サーバー環境においては、デザイナーにパスワードを割り当てることで、4Dユーザーログインダイアログが表示されるようになります。 この環境では、デザインモードは読み取り専用です。
デザイナーの次に強力なユーザーは **管理者 (Administrator)**であり、通常はパスワードアクセスシステムや管理機能を扱う役割を与えられています。
管理者は次のことができます:
- ユーザーやグループを作成する。
- 4D Server 管理ウィンドウとモニターにアクセスする。
- バックアップ、復元、サーバーの監視のため、MSC にアクセスする。
管理者は次のことができません:
- デザイナーユーザーを編集する。
- アプリケーションの保護された領域にアクセスする。 とくにデザインモードが制限されている場合には、管理者はアクセスすることができません。 管理者がアプリケーション内でアクセス権を得るには、1つ以上のグループに属さなければなりません。 管理者はすべての新規グループに含まれますが、任意のグループから管理者の名前を取り除くことができます。
デザイナーと管理者は、すべてのアプリケーションにおいてデフォルトで利用可能です。 デザイナーと管理者は、すべてのアプリケーションにおいてデフォルトで利用可能です。 ユーザー管理のダイアログボックスにおいて、デザイナーと管理者のアイコンは、それぞれ赤色と緑色で表示されます:
- デザイナーアイコン:

- 管理者アイコン:

デザイナーと管理者の名前は変更することができます。 ランゲージにおいて、デザイナーと管理者の ID値は、常に 1 と 2 に設定されます。
デザイナーと管理者は、それぞれ 16,000 のグループと 16,000 のユーザーを作成することができます。
ユーザーエディター
ユーザーのエディターは 4Dのツールボックスにあります。
ユーザーとグループのエディターは、EDIT ACCESS コマンドを使用することでランタイムで表示することもできます。 ユーザーとグループの設定は、アプリケーション実行中でも
Users and Groupsテーマの 4Dランゲージコマンドを使って編集することができます。 ユーザーとグループの設定は、アプリケーション実行中でもUsers and Groupsテーマの 4Dランゲージコマンドを使って編集することができます。
ユーザーの追加と変更
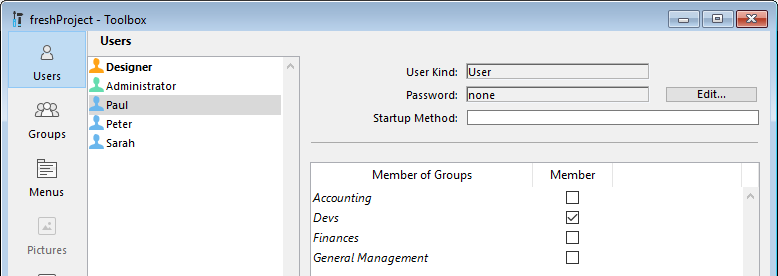
ユーザーエディターを使用して、ユーザーアカウントの作成やプロパティの設定、各グループへの割り当てをおこないます。
ユーザーを追加するには:
- デザイン メニューから ツールボックス>ユーザー を選択、または 4Dツールバーの ツールボックス ボタンをクリックします。 4Dはユーザーエディターを表示します。 4Dはユーザーエディターを表示します。
ユーザーリストには、デザイナーと管理者 を含むすべてのユーザーが表示されます:
- ユーザーリストの下にある追加ボタン
 をクリックします。
ユーザーリストの下にある追加ボタン をクリックします。
または
をクリックします。
ユーザーリストの下にある追加ボタン をクリックします。
または
ユーザーリスト上で右クリックし、コンテキストメニューから 追加 または 複製 を選択する。
複製 コマンドを使用すると、同じ特性を持つ複数のユーザーを素早く作成することができます。
4D は新規ユーザーをリストに追加し、デフォルトとして "新規ユーザーX" という名前を設定します。
-
新しいユーザー名を入力します。 この名前は、ユーザーがアプリケーションを開く際に使用されます。 新しいユーザー名を入力します。 この名前は、ユーザーがアプリケーションを開く際に使用されます。 ユーザー名をいつでも変更することができます。変更するにはコンテキストメニューの 名称変更 コマンドを使用するか、Alt+クリック (Windows) または Option+クリック (macOS) ショートカットを使用、または変更したい名前を 2回クリックします。
-
ユーザーのパスワードを設定するには、プロパティエリアで 編集... ボタンをクリックして、ダイアログボックスの 2つのパスワード欄に同じパスワードをそれぞれ入力します。 パスワードには 15桁までの英数字を使用することができます。 パスワードでは文字の大小が区別されます。 パスワードには 15桁までの英数字を使用することができます。 パスワードでは文字の大小が区別されます。
ストラクチャー設定の "セキュリティ" ページで許可されていれば、ユーザーは自分のパスワードを変更できます。また、パスワードは
CHANGE PASSWORDコマンドを使って変更することもできます。
- グループメンバー表を用いて、そのユーザーが所属するグループを設定します。 メンバーカラムの該当するオプションをチェックして、選択したユーザーをグループに対して追加・削除することができます。
グループページ を使用して、各グループの所属ユーザーを設定することもできます。
ユーザーの削除
ユーザーを削除するには、そのユーザーを選択してから削除ボタンをクリックするか、またはコンテキストメニューの 削除 コマンドを使用します。
![]()
![]()
削除されたユーザー名は、その後ユーザーエディターには表示されません。 削除されたユーザーの ID番号は、新規アカウント作成の際に再度割り当てられるという点に注意してください。
ユーザープロパティ
-
ユーザーの種類: "デザイナー"、"管理者"、または (それ以外のすべてのユーザーの場合にあ) "ユーザー"
-
開始メソッド: ユーザーがアプリケーションを開いたときに自動実行されるメソッドの名称 (任意) このメソッドを使って、たとえばユーザー設定をロードできます。 このメソッドを使って、たとえばユーザー設定をロードできます。
グループエディター
グループのエディターは 4Dのツールボックスにあります。
グループの設定
グループエディターを使用して、各グループ内に納める要素 (ユーザーや他のグループ) を設定したり、プラグインへのアクセス権を割り当てることができます。
グループは一旦作成されると、削除できないということに留意が必要です。 グループを使用したくない場合は、そのグループの所属ユーザーをすべて取り除きます。
グループを作成するには:
-
デザイン メニューから ツールボックス>ユーザーグループ を選択、または 4Dツールバーの ツールボックス ボタンをクリックし、グループ ページを開きます。 4D はグループエディターウインドウを表示します: グループリストには、アプリケーションプロジェクトのすべてのグループが表示されます。 4D はグループエディターウインドウを表示します: グループリストには、アプリケーションプロジェクトのすべてのグループが表示されます。 グループリストには、アプリケーションプロジェクトのすべてのグループが表示されます。
-
グループリストの下にある追加ボタン
をクリックします。
グループリストの下にある追加ボタン をクリックします。
または
グループリスト上で右クリックし、コンテキストメニューから 追加 または 複製 を選択します。
複製コマンドを使用すると、同じ特性を持つ複数のグループを素早く作成することができます。
4D は新規グループをリストに追加し、デフォルトとして "新規グループX" という名前を設定します。
- 新しいグループの名前を入力します。 グループ名には 15桁までの文字を使用できます。 新しいグループの名前を入力します。 グループ名には 15桁までの文字を使用できます。 グループ名をいつでも変更することができます。変更するにはコンテキストメニューの 名称変更 コマンドを使用するか、Alt+クリック (Windows) または Option+クリック (macOS) ショートカットを使用、または変更したい名前を 2回クリックします。
ユーザーやグループをグループに入れる
任意のユーザーやグループをグループ内に配置することができます。 さらに、そのグループ自体を他のいくつかのグループ内に入れることも可能です。 必ずしもユーザーをグループに入れる必要はありません。
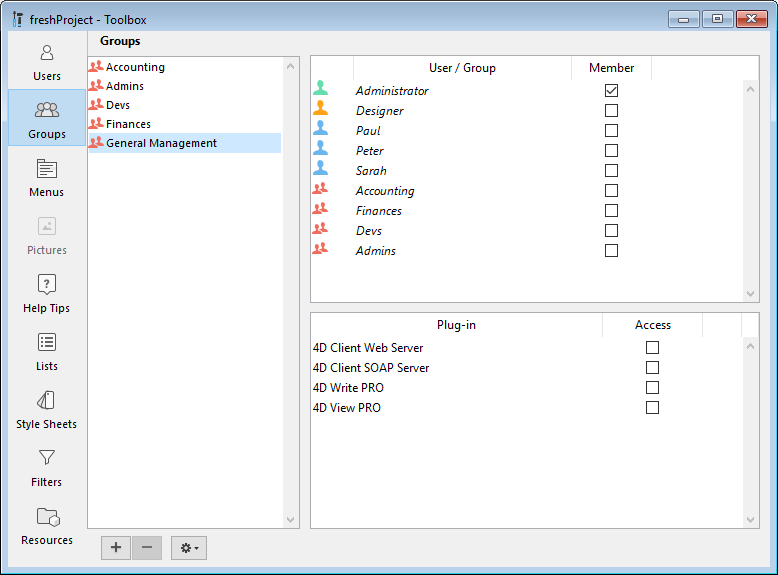
ユーザーやグループをグループに配置するには、当該グループのユーザー/グループ一覧にてメンバーカラムにチェックを入れます:

ユーザー名をチェックすると、そのユーザーがグループに追加されます。 グループ名をチェックした場合は、そのグループの全ユーザーがグループへ追加されます。 メンバーの一員となったユーザーやグループには、そのグループに割り当てられたものと同じアクセス権が与えられます。
グループを別のグループ内に入れることにより、ユーザーの階層構造が作成されます。 別のグループの配下に入れられたグループのユーザーは、両グループのアクセス権を保持します。 後述の アクセス権の階層構造 を参照してください。
ユーザーやグループをグループから取り除くには、ユーザー/グループ一覧でチェックを解除します。
プラグインやサーバーにグループを割り当てる
プロジェクトにインストールされたプラグインへのアクセス権をグループに割り当てることができます。 これには 4D のプラグインと任意のサードパーティープラグインが含まれます。
プラグインへのアクセス権を割り当てると、所有するプラグインライセンスの使用を管理できるようになります。 プラグインのアクセスグループに属さないユーザーは、そのプラグインをロードすることができません。
使用されたライセンスは 4Dセッションの間、当該グループに所属する 4Dユーザーアカウントに紐づけられます。
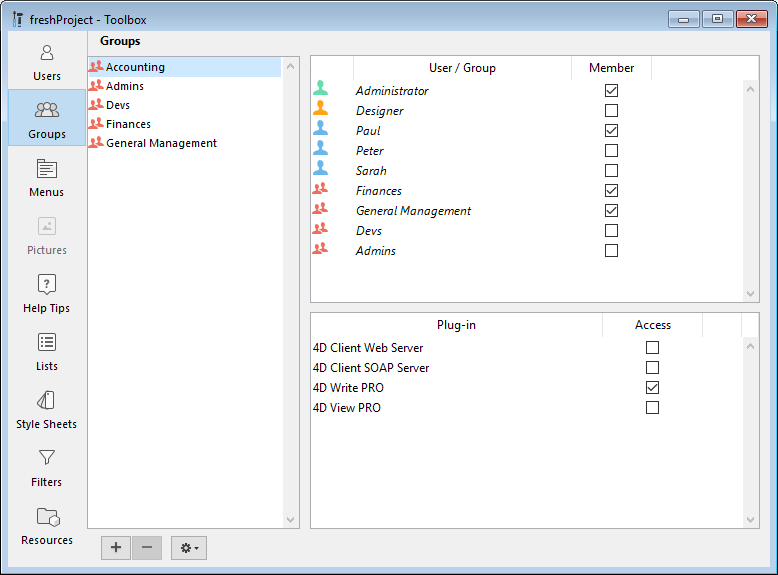
ツールボックスのグループページにある "プラグイン" エリアには、4Dアプリケーションによりロードされたプラグインがすべて表示されます。 プラグインへのアクセス権をグループに与えるには、該当するオプションをチェックします。

4D Client Web Server や 4D Client SOAP Server 項目を使用し、リモートモードの 4D がそれぞれ Web および SOAP (Webサービス) 公開をおこなえるかどうかを管理することができます。 これらのライセンスは 4D Server 側ではプラグインライセンスとしてみなされます。 したがって、プラグインと同じ方法で、これらのライセンスの使用権を特定のユーザーグループに限定することができます。
アクセス権の階層構造
アプリケーションのセキュリティを確保し、ユーザーに異なるアクセスレベルを提供する最も効果的な方法は、アクセス権の階層構造を利用することです。 ユーザーを適切なグループに割り振り、各グループをネストすることで、アクセス権の階層構造を形成できます。 この節では、このような構造の取り扱い方について説明します。
この例題では、ユーザーは担当業務に応じて 3つあるグループの 1つに割り振られます。 データ入力担当のユーザーは、Accounting (会計) グループに割り当てます。 レコードの更新や無効データの削除などデータ管理を担当するユーザーは、Finances (財務) グループに割り当てます。 検索の実行や分析レポートの印刷などデータ分析を担当するユーザーは、General Management (総合管理) グループに割り当てます。
割り当て完了後は、各グループのユーザーに権限が正しく配分されるようにグループをネストします。
-
General Managementグループには "高レベル" のユーザーだけが含まれます。
-
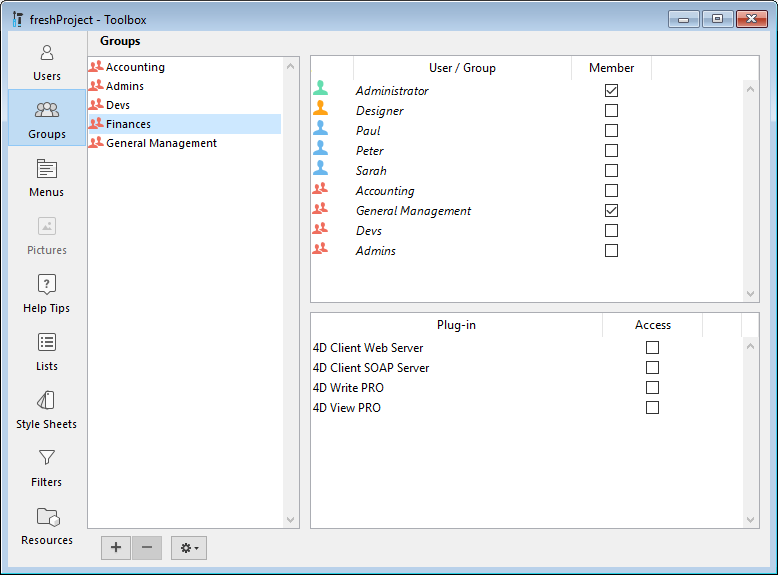
Financesグループには、データ管理ユーザーと General Managementグループが含まれます。したがって、General Managementグループのユーザーは Financesグループの権限も保持します。
-
Accountingグループには、データ入力をおこなうユーザーと Financesグループが含まれます。したがって、Financesグループのユーザーと General Managementグループのユーザーは Accountingグループの権限も利用できます。
所属ユーザーの責務に基づいて、各グループに割り当てるアクセス権を決定します。
このような階層システムを使用すると、新規ユーザーに割り当てるべきグループがわかりやすくなります。 各ユーザーを 1つのグループに割り当てるだけで、グループの階層を介してアクセス権を決定できます。
権限を割り当てる
グループには、アプリケーションの特定機能へのアクセス権が割り当てられます:
- デザイン環境やランタイムエクスプローラー
- HTTPサーバー
- RESTサーバー
- SQLサーバー
これらのアクセス権はストラクチャー設定で定義します。 次の図は、デザインおよびランタイムエクスプローラーアクセス権を "Devs" グループに割り当てている様子を表しています (データベース設定の "セキュリティ" タブ):

また、グループを使って 利用可能なライセンスを割り当てる こともできます。 この割り当ては、グループエディターで定義します。 この割り当ては、グループエディターで定義します。
Directory.json ファイル
ユーザー、グループ、およびそれらのアクセス権は、directory.json という名称の専用のプロジェクトファイルに保存されます。
必要に応じて、このフォルダーは次の場所に保存することができます:
- すべてのデータファイルについて同じディレクトリを使用する場合 (または 1つのデータファイルだけを使用する場合)、ユーザー設定フォルダー ("Project" フォルダーと同じ階層 の "Settings" フォルダー) に directory.json ファイルをに保存します (デフォルトの場所)。
- データファイルごとに特定のディレクトリファイルを使用する場合は、directory.json ファイルをデータ設定フォルダー、つまり "Data" フォルダーの "Settings" フォルダー に格納します。 directory.json ファイルがこの場所に保存されている場合、ユーザー設定フォルダーのファイルよりも優先されます。 アプリケーションをアップグレードしても、このカスタム/ローカルなユーザー&グループ設定はそのままです。 directory.json ファイルがこの場所に保存されている場合、ユーザー設定フォルダーのファイルよりも優先されます。 アプリケーションをアップグレードしても、このカスタム/ローカルなユーザー&グループ設定はそのままです。
パスワードやグループメンバーシップを運用環境において安全に変更できるようにするには、ビルド時に 対応するビルドアプリケーションオプション を使用して、サーバーアプリケーションに directory.json ファイルを含めることができます。