クライアント-サーバーページ
クライアント/サーバーページには、クライアント/サーバーモードでデータベースを使用する際に使用されるパラメーターが集められています。 これらの設定は、リモートモードでデータベースが使用されるときにのみ使用されます。
ネットワークオプションページ
ネットワーク
起動時にデータベースを公開する
このオプションを使用して、起動された 4D Server データベースが公開データベースのリストに表示されるかどうかを指定できます。
- このオプションが選択されていると (デフォルト)、データベースは公開され、公開データベースの一覧に表示されます (リモート4D の 利用可能タブ)。
- このオプションがチェックされていないと、データベースは公開されず、公開データベースの一覧に表示されません。 接続するには、接続ダイアログボックスの カスタム タブにデータベースのアドレスを手入力しなければなりません。
この設定を変更した場合、変更を反映するためサーバデータベースを再起動する必要があります。
公開名
このオプションでは、4D Server データベースの公開名を変更できます。この名前は接続ダイアログボックスの 利用可能 ページに表示されます (リモートプロジェクトを開く 参照)。 デフォルトで 4D Server はプロジェクトファイル名を使用します。 これを好きな名前に変更できます。 デフォルトで 4D Server はプロジェクトファイル名を使用します。 これを好きな名前に変更できます。
このパラメーターはカスタムのクライアント-サーバーアプリケーションでは使用されません。 クライアントアプリケーションは接続ダイアログを経由せずにサーバーに直接接続します。 しかしエラーが発生すると、このダイアログが表示されます。 この場合、サーバーアプリケーションの公開名はコンパイルされたプロジェクトの名前です。
ポート番号
このオプションで、4D Server がデータベースを公開する TCPポート番号を変更できます。 この情報は、プロジェクト及び各クライアントマシンに格納されます。 4D Server とリモートモードの 4D が使用するデフォルトの TCPポート番号は 19813 です。
TCPプロトコルを使用して、1台のマシン上で複数の 4Dアプリケーションを同時に使用したい場合にこの値の変更が必要です。 この場合、アプリケーションごとに異なるポート番号を割り当てなければなりません。 4D Server または 4D からこの値を変更すると、データベースに接続しているすべての 4Dマシンに変更が通知されます。
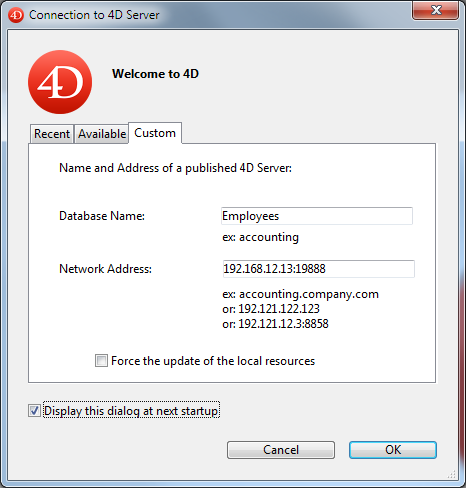
接続していないクライアントを更新するには、次回の接続時に接続ダイアログボックスの カスタム ページにて、サーバーマシンの IPアドレスに続けてコロン、そして新しいポート番号を入力します。 たとえば、新しいポート番号が 19888 あるとき: たとえば、新しいポート番号が 19888 あるとき:
4Dクライアントと同じポート番号で公開されているデータベースだけが、接続ダイアログの利用可能ページに表示されます。
4D Server とポート番号
4D Server は 3つの TCPポートを使用して、内部サーバーとクライアントの通信をおこないます:
- SQLサーバー: デフォルトで 19812 (設定の "SQL" ページで変更可)。
- アプリケーションサーバー: デフォルトで 19813 (設定の "クライアント-サーバー" ページで変更可)。
- DB4Dサーバー (データベースサーバー): デフォルトで 19814。 このポート番号は直接変更できませんが、常にアプリケーションサーバーのポート番号+1 です。\ 4Dクライアントが 4D Server に接続するとき、アプリケーションサーバーのポート番号 (19813 または接続ダイアログボックスの IPアドレス欄でコロンの後ろに指定された番号) を使用して接続します。 その後の、それぞれ対応するポートを介した他のサーバーへの接続は自動です。再度ポート番号を指定する必要はありません。\ ルーターやファイアウォール越しに接続する場合には、この 3つのポートを明示的に開く必要があります。
- リモートデバッガー: デフォルトで 19815。 このポート番号は直接変更できませんが、常にアプリケーションサーバーのポート番号+2 です。
ドメインサーバーによるユーザーの認証
このオプションは Windows上の 4D Server データベースにおいて SSO (Single Sign On) 機能の実装を可能にします。 このオプションを有効にすると、4D はバックグラウンドで Windows ドメインサーバーの Active Directory に接続し、提供されている認証トークンを取得します。 このオプションの詳細については Windowsでのシングルサインオン(SSO) を参照ください。
サービスプリンシパル名 (SPN)
Single Sign On (SSO) が有効になっている場合 (上述参照)、認証プロトコルにケルベロスを使用するには、このフィールドを設定する必要があります。 このオプションの詳細については Windowsでのシングルサインオン(SSO) を参照ください。
ネットワークレイヤー
このドロップダウンボックスには利用可能なネットワークレイヤーが格納されており、これを使用して4D Server とリモート4D マシン(クライアント)間での通信を管理することができます。
-
QUIC (プロジェクトモードのみ): サーバー上でQUIC ネットワークレイヤーを有効にします。
QUIC に関する注意点:
Application infoコマンドを使用することで、4D アプリケーションがQUIC ネットワークレイヤーを実行中かどうかを知ることができます。- QUIC は UDPプロトコルを使用するため、ネットワークのセキュリティ設定で UDP が許可されている必要があります。
- QUIC は、アプリケーションサーバーおよびDB4D サーバー の両方においてポート19813 番へと自動的に接続します。
- QUICレイヤーオプションを選択すると:
- クライアント/サーバー接続タイムアウト の設定は非表示になります。
- クライアント-サーバー通信の暗号化 チェックボックスは非表示になります (セキュアモードに関わらず、QUIC 通信は常に TLS です)。
- 互換性: QUICネットワークレイヤーに切り替えるには、まずクライアント/サーバーアプリケーションを 4D 20以上で運用する必要があります。
-
ServerNet (バイナリーデータベースでのみ利用可能なオプション): サーバー上でServerNet レイヤーを有効化します。
プロジェクトにおいては、QUIC ネットワークレイヤーの使用が 推奨されています。
オプションを変更した場合、変更を反映するには 4Dアプリケーションを再起動する必要があります。 接続していたクライアントアプリケーションも、新しいネットワークレイヤーで接続するため再起動しなければなりません。
クライアント/サーバー接続タイムアウト
このオプションは、 QUIC ネットワークレイヤーが選択されている場合には利用できません。
このサーモメーターで、4D Server とクライアントマシン間の (一定時間活動がないときに接続を閉じる) タイムアウトを設定できます。 無制限オプションは、タイムアウトを設定しないことを意味します。 このオプションが選択されると、クライアントのアクティビティコントロールはおこなわれません。
タイムアウト時間が選択されると、その間にリクエストを受信しなかった場合、サーバーはそのクライアントとの接続を閉じます。
クライアント-サーバー通信
Execute On Clientのために起動時にクライアント登録
このオプションが選択されていると、データベースに接続するすべての 4Dリモートマシン上でメソッドをリモート実行できます。 このメカニズムについては クライアントマシン上でのストアドプロシージャ で説明しています。
クライアント-サーバー通信の暗号化
このオプションは、 QUIC ネットワークレイヤーオプションが選択されている場合には利用できません。
このオプションを使用して、サーバーマシンと 4Dリモートマシン間通信の保護モードを有効にできます。 このオプションについては クライアント/サーバー接続の暗号化 で説明しています。
セッション中に "Resources" フォルダーを更新
この設定は、データベースの Resources フォルダーがセッション中に更新された場合について、接続中のクライアントマシンにおける同フォルダーのローカルインスタンスの更新モードを包括的に指定します (Resources フォルダーは、セッションが開かれるたびにリモートマシン上で自動的に同期されます)。 3つの選択肢があります: 3つの選択肢があります:
- しない: ローカルの Resources フォルダーはセッション中に更新されません。 サーバーから送信される通知は無視されます。 ローカルリソースを更新 アクションメニューコマンド (リソースエクスプローラーを使用する 参照) を使用すれば、ローカルの Resourcesフォルダーを手動で更新することができます。 サーバーから送信される通知は無視されます。 ローカルリソースを更新 アクションメニューコマンド (リソースエクスプローラーを使用する 参照) を使用すれば、ローカルの Resourcesフォルダーを手動で更新することができます。
- 常に: セッション中にサーバーから通知が送信されると、ローカルの Resources フォルダーは自動で同期されます。
- その都度指定: サーバーから通知を受け取ると、クライアントマシン上でダイアログボックスが表示されます。 ユーザーはローカルの Resources フォルダーの同期を受け入れ、あるいは拒否できます。\ Resources フォルダーは、データベースインタフェースで使用されるカスタムファイルを格納しています (翻訳ファイルやピクチャーなど)。 このフォルダーの内容が更新されたときには、自動又は手動メカニズムを使用して各クライアントに通知できます。 詳細については、リソースフォルダの管理 を参照ください。
IP設定ページ
許可-拒否設定表
この表を使用して、4Dリモートマシンの IPアドレスに基づき、データベースへのアクセスコントロールルールを設定できます。 このオプションを使用して、たとえば戦略アプリケーションなどのセキュリティを高めることができます。
Web接続は、この設定表でコントロールされません。
設定表の動作は以下のとおりです:
- "許可-拒否" 列では、ポップアップメニューを使用して適用するルールを選択します (許可または拒否)。 ルールを追加するには、追加ボタンをクリックします。 すると、新しい行が表に追加されます。 削除 ボタンで選択した行を削除できます。
- "IPアドレス" 列で、ルールに関連する IPアドレスを指定します。 アドレスを指定するには、選択した行のセルをクリックし、以下の形式でアドレスを入力します: 123.45.67.89 (IPv4) または 2001:0DB8:0000:85A3:0000:0000:AC1F:8001 (IPv6)。 * (アスタリスク) 文字をアドレスの末尾に使用して、範囲を指定することもできます。 たとえば、192.168.* は 192.168 で始まるすべてのアドレスを示します。
- ルールの適用は、表中の表示順に基づきます。 2つのルールが矛盾する設定の場合、より上に設定されているルールが優先されます。 行の順番を変更するには、列のヘッダーをクリックしてソートをおこなったり、 ドラッグ&ドロップで移動したりすることができます。
- セキュリティのため、ルールにより明示的に許可されたアドレスのみが接続を許可されます。 言い換えれば、表に拒否ルールしか定義されていない場合、許可ルールに適合するアドレスがないため、すべてのアドレスからの接続が拒否されます。 特定のアドレスからの接続のみを拒否したい場合 (そして他を許可したい場合)、許可 * ルールを表の最後に追加します。 例:
- 拒否 192.168.* (192.168 で始まるアドレスを拒否)
- 許可 * (他のアドレスはすべて許可)
デフォルトでは、4D Server にアクセス制限はありません。 最初の行には * (すべてのアドレス) に対する許可ルールが設定されています。