Client/Server Management
4D Desktop applications can be used in a Client/Server configuration, either as merged client/server applications or as remote projects.
-
merged client/server applications are generated by the Build Application manager. They are used for application deployments.
-
remote projects are .4DProject files opened by 4D Server and accessed with 4D in remote mode. The server sends a .4dz version of the project (compressed format) to the remote 4D, thus structure files are read-only. This configuration is usually used for application testing.
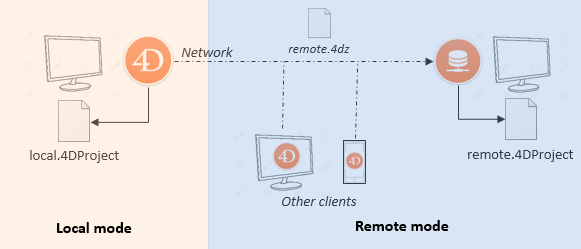
Connecting to a remote project from the same machine as 4D Server allows modifying the project files. This specific feature allows to develop a client/server application in the same context as the deployment context.
Opening a merged client/server application
A merged client/server application is customized and its starting is simplified:
- To launch the server portion, the user simply double-clicks on the server application. The project file does not need to be selected.
- To launch the client portion, the user simply double-clicks the client application, which connects directly to the server application.
These principles are detailed in the Build Application page.
Opening a remote project
The first time you connect to a 4D Server project via a remote 4D, you will usually use the standard connection dialog. Thereafter, you will be able to connect directly using the Open Recent Projects menu or a 4DLink shortcut file.
To connect remotely to a 4D Server project:
- Do one of the following:
- Select Connect to 4D Server in the Welcome Wizard dialog
- Select Open/Remote Project... from the File menu or the Open toolbar button.
The 4D Server connection dialog appears. This dialog has three tabs: Recent, Available, and Custom.
If 4D Server is connected to the same subnetwork as the remote 4D, select Available. 4D Server includes a built-in broadcasting system that, by default, publishes the name of the 4D Server projects available over the network. The list is sorted by order of appearance and updated dynamically.
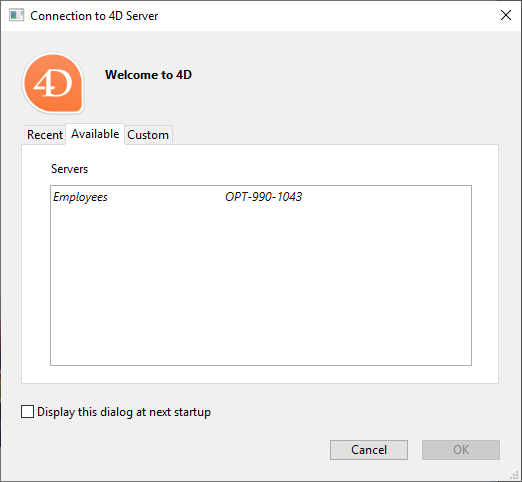
To connect to a server from the list, double-click on its name or select it and click the OK button.
If the published project is not displayed in the Available list, select Custom. The Custom page allows you to connect to a published server on the network using its network address and assigning it a customized name.
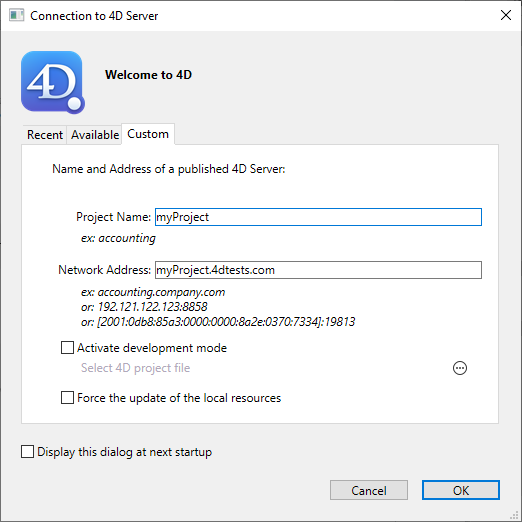
- Project name: Defines the local name of the 4D Server project. This name will be used in the Recent page when referring to the project.
- Network address: The IP address of the machine where the 4D Server was launched.
- If two servers are executed simultaneously on the same machine, the IP address must be followed by a colon and port number, for example:
192.168.92.104:19814. - By default, the publishing port of a 4D Server is 19813. This number can be modified in the Project settings.
- If two servers are executed simultaneously on the same machine, the IP address must be followed by a colon and port number, for example:
The Activate development mode option opens the remote connection in a special read/write mode and requires to access the project folder from the remote 4D.
Once this page assigns a server, clicking the OK button will allow you to connect to the server.
Once a connection to the server has been established, the remote project will be listed on the Recent tab.
Updating project files on the server
4D Server automatically creates and sends the remote machines a .4dz version of the .4DProject project file (not compressed) in interpreted mode.
- An updated .4dz version of the project is automatically produced when necessary, i.e. when the project has been modified and reloaded by 4D Server. The project is reloaded:
- automatically, when the 4D Server application window comes to the front of the OS or when the 4D application on the same machine saves a modification (see below).
- when the
RELOAD PROJECTcommand is executed. Calling this command is necessary for example when you have pulled a new version of the project from the source control platform.
Updating project files on remote machines
When an updated .4dz version of the project has been produced on 4D Server, connected remote 4D machines must log out and reconnect to 4D Server in order to benefit from the updated version.
Using 4D and 4D Server on the same machine
When 4D connects to a 4D Server on the same machine, the application behaves as 4D in single user mode and the design environment allows you to edit project files. This feature allows you to develop a client/server application in the same context as the deployment context.
When 4D connects to a 4D Server on the same machine, the development mode is automatically activated, whatever the Development mode status.
Each time 4D performs a Save all action from the design environment (explicitly from File menu or implicitly by switching to application mode for example), 4D Server synchronously reloads project files. 4D waits for 4D Server to finish reloading the project files before it continues.
However, you need to pay attention to the following behavior differences compared to standard project architecture:
- the userPreferences.{username} folder used by 4D is not the same folder used by 4D Server in the project folder. Instead, it is a dedicated folder, named "userPreferences", stored in the project system folder (i.e., the same location as when opening a .4dz project).
- the folder used by 4D for derived data is not the folder named "DerivedData" in the project folder. Instead it is a dedicated folder named "DerivedDataRemote" located in the project system folder.
- the catalog.4DCatalog file is not edited by 4D but by 4D Server. Catalog information is synchronised using client/server requests
- the directory.json file is not edited by 4D but by 4D Server. Directory information is synchronised using client/server requests
- 4D uses its own internal components and plug-ins instead of those in 4D Server.
It is not recommended to install plug-ins or components at the 4D or 4D Server application level.
Development mode
The Development mode in 4D Server is a special project opening mode that allows read/write access for connected remote 4D applications. The project must be available in interpreted mode.
This mode allows one or more developers to work simultaneously on the same project in Design environment. When a project is opened in Development mode:
- Project files are available in read/write so that you can edit methods, forms, etc.
- Several remote 4D can concurrently open the same interpreted project files and edit them. An automatic locking system prevents from concurrent access to the same resource.
- Modifications are made available to all remote developers. Note however that there is no automatic push to remote developers, they need to refresh to get latest versions of files (a refresh is done each time the developer switches from design mode to application mode for example, or selects Save all from the File menu).
To use this mode, select the Activate development mode option in the connection dialog box from your remote 4D. You are prompted to Select 4D project file: you need to select the .project file that 4D Server has opened. If you select a different file, an alert dialog box warns you that the development mode is not available. It means that the remote 4D must have access to the project folder over the network (the whole project folder must be shared, i.e. the root folder of the project).
For performance reasons with this configuration, it is strongly recommended that the project folder be stored on a dedicated file server (e.g. a NAS) on a local network.
When both the server and the remote 4D are on the same machine, additional rules applies.
Here is an overview of the development mode architecture:
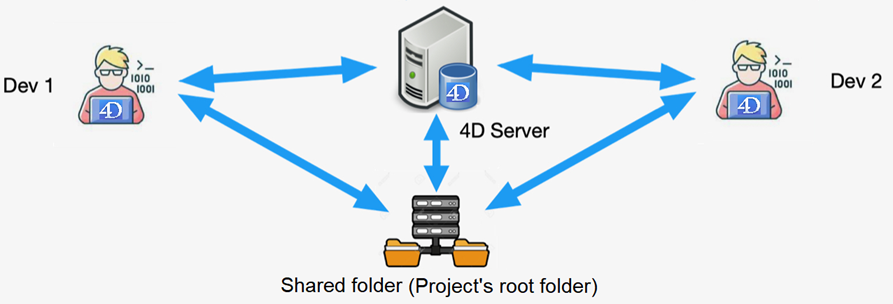
This feature is designed for small-size development teams who are used to work on binary databases and want to benefit from project features while maintaining their current organisation. However, for multi-user development on 4D projects, we recommend using a standard architecture where developers work on their machine and manage their work using source control repository tools (Git, SVN, etc.). This organisation provides a great flexibility by allowing developers to work on different branches, and compare, merge, or revert modifications.
Code execution location
In a client/server application, it is important to know where your code will be actually executed: server-side or client-side. Execution location is crucial when you want to implement user session-related code, share information between processes, access data, etc.
The following table summarizes where the code is executed by default and how to switch its execution location (if allowed). Note that local means that the code will be executed on the machine from where it is actually called.
| Code | Default execution | How to switch |
|---|---|---|
| ORDA data model functions | server | use local keyword in function definition |
ORDA computed attribute functions get(), set() | server | use local keyword in function definition |
ORDA computed attribute functions query(), orderBy() | server | n/a |
| ORDA event functions (general) | server | n/a |
ORDA event function constructor() | local | n/a |
ORDA event function event touched() | server | use local keyword in function definition |
| User class functions | local | n/a |
| Shared or session singleton function | local | use server keyword in function definition |
| Trigger | server | n/a |
| Project method called from a client | client | check Execute on server option. The code is executed in the twin process of the user session process |
call Execute on server command. The code is executed in the Stored procedures session | ||
| Project method called from a stored procedure on the server | server | call EXECUTE ON CLIENT command. The target client must have been registered |
| Object method | local | n/a |
Database methods:
| server | n/a |
Database methods:
| client | n/a |
Management of sleeping client sessions
4D Server specifically handles cases where a machine running a 4D remote application switches to sleep mode while its connection to the server remains active.
In this case, the remote application notifies 4D Server before entering sleep mode. The corresponding client session changes to the Sleeping status.
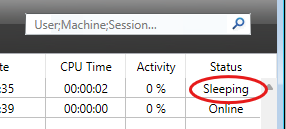
This status frees server resources while preserving the session context.
When the remote machine wakes up, the application automatically reconnects and restores the existing session.
A sleeping client session is automatically dropped after 48 hours of inactivity.
You can modify this timeout using the SET DATABASE PARAMETER command with the Remote connection sleep timeout selector.
Management of unreachable peer
When the QUIC network layer is used, client/server sessions benefit from an automatic reconnection feature in case of unexpected disconnections. Unexpected disconnections include for example:
- LAN cable unplug/plug,
- Handover with a mobile connection,
- Switch reboot,
- Small network error.
This feature supports both server-side and client-side management in the event of a lost connection with a peer, and includes configurable timeouts and real-time information.
Unreachable event
The QUIC network layer automatically emits an "Unreachable" event to 4D Server when a remote 4D unexpectedly stops responding; conversely, it automatically emits an "Unreachable" event to a remote 4D when the 4D Server unexpectedly stops responding. When the "Unreachable" event is received on either side, it is immediately reflected in the interface and in the machine's Session object.
Remote stops responding
When a remote 4D unexpectedly stops responding, on the Server administration window, the remote session status is set to Unreachable.

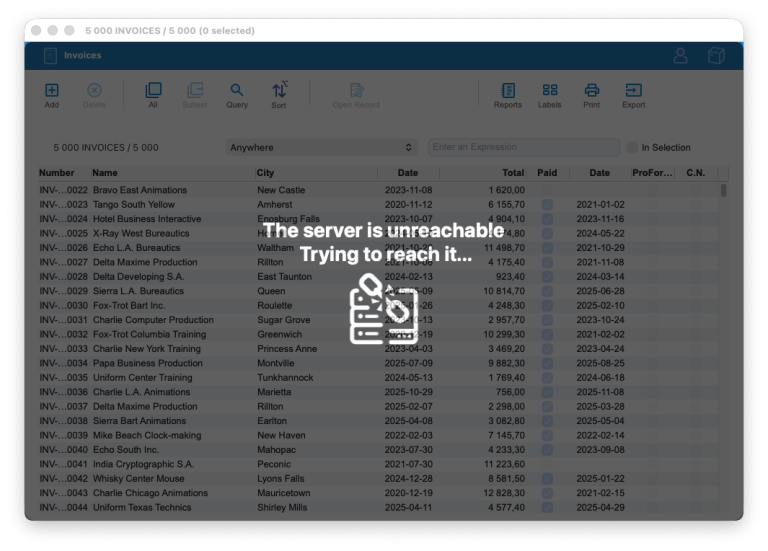
Server stops responding
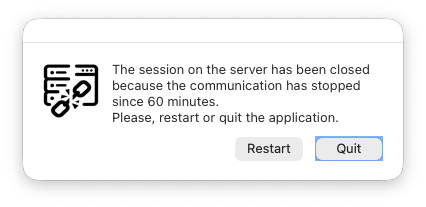
If 4D Server unexpectedly stops responding, a reconnection dialog box is displayed on the remote machine:
Session object updated
When the "Unreachable" event is received on either side, an info.unreachableSince property is created in the session on the machine receiving the event (on the server, it is readable through the Process activity.sessions property), and it starts counting seconds since the last communication. You can use this property to implement your own disconnection interface.
Restoring or closing connection
The QUIC session timeout is 900 seconds (15 minutes) by default, it can be modified using the QUIC session timeout selector of the SET DATABASE PARAMETER command.
The QUIC session timeout is automatically used to monitor disconnections:
- If the connection is restored before the QUIC session timeout is reached, the
info.unreachableSinceproperty is automatically removed from the session object. - If the connection is not restored before the QUIC session timeout is reached, the session is closed.
- In case of a remote session closed from the server, a warning entry is written in the diagnostic log.
- In case of a server session closed from a remote machine, a warning dialog box is displayed so that the user can restart the remote application or quit: