AI page
The AI page allows you to add, remove, or view the list of all your AI providers and their related model aliases, whether they come from local sources or internet-based services. Providers and model aliases can then be used in your code througout your 4D application, especially with the 4D-AIKit component using the model aliases feature.
Managing providers
4D supports various AI providers with an OpenAI-like API, each offering unique models and features for database needs.
By default, the Providers list is empty.
Adding a provider
To add an AI provider:
- Click on the + button at the bottom of the Providers list.
- Enter the required provider's configuration fields, including credentials.
- (optional) Click the Test connection button to make sure the provided URL and credentials are valid.
If the connection is successful, the number of available models is displayed on the right side of the button:
![]()
If the connection test fails, an error message is displayed (e.g. "Request failed: Not found" or "Request failed: Unauthorized").
- Click OK to save the new provider, or Cancel to revert all modifications.
Editing a provider
To edit or remove a provider:
- Select a registered provider in the list.
- Edit the provider's information OR to remove a provider, click on the - button at the bottom of the Providers list.
- Click OK to save the modifications, or Cancel to revert all modifications.
Provider properties
When you select a provider in the Providers list, several properties are available. Property names in bold are mandatory to create a Provider.
Nome
Local name used to identify the provider in your code, for example "claude". The name must be compliant with property names since it will be used in the application's code to reference the provider.
Base URL
Endpoint of the provider's API, for example https://api.openai.com/v1 or http://localhost:11434/v1.
The combo box lists the main providers, you can select a value to enter the provider endpoint:

API Key
(optional) API key for the provider. For instructions on generating an API key, please refer to your AI provider’s official documentation. Some AI providers may also require additional specific credentials.
Organization
(optional, OpenAI-specific) Organization ID used by the OpenAI API.
Project
(optional, OpenAI-specific) ID of the project. Each OpenAI API key is attached to a project.
AIProviders.json
The provider configuration is stored in a JSON file named AIProviders.json located next to the active settings.4DSettings file within the project folder, depending on your deployment configuration.
The AIProviders.json file contains your provider API keys. If your project is stored on a source control repository tool such as GitHub or GitLab, make sure the AIProviders.json file is registered in the .gitignore file, otherwise your keys could be publicly exposed.
Deployment with an API key
When configuring an AI provider, you need to provide your own API key. It requires an external registration for getting API keys/credentials from AI providers.
Using the Settings dialog box, the 4D developer can define a custom provider name (for example "open-ai-v1") and use this custom name in the code. They can also test it using their API key.
When the 4D application is deployed with the User settings enabled, the administrator can configure the User settings by using the same AI provider name ("open-ai-v1") and customize the API key to use the customer's key. Thanks to the User settings priority rules, the customer settings will automatically override the developer settings.
When using 4D in client/server mode, it is strongly recommended to execute AI-related code on the server side to protect API keys and credentials from exposure to remote machines.
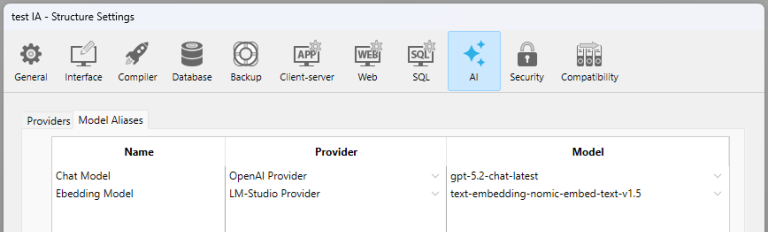
Model Aliases
The Model Aliases page allows you to list models from registered Providers that you want to use in your code and to name them with aliases. Thanks to model aliases, you avoid hardcoding model names, switch models without changing your code, and keep consistency across environments.
When using a model alias:
- The provider is automatically resolved (see Model resolution in the 4D-AIKit documentation).
- The model ID is applied.
- All credentials and endpoints are used.
Adding a model alias
To be able to add a model alias, you must have entered at least one valid provider in the Providers tab.
To add a model alias:
- Click on the + button at the bottom of the model aliases list.
- In the Name column, enter the name of the alias.
- Click on the corresponding row in the Provider column to display the list of available providers (provider names you entered in the Providers page), and select the name of the provider.
- Click on the corresponding row in the Model column to display the list of available models exposed by the selected provider and select the model.
- Click OK to save the modifications, or Cancel to revert all modifications.
Editing a model alias
To edit or remove an alias:
- Select a model alias in the list.
- Edit the alias information OR to remove a alias, click on the - button at the bottom of the list.
- Click OK to save the modifications, or Cancel to revert all modifications.
Using a model alias
You can directly use the model alias name wherever a model name is required (provided that model aliases are supported).
For example, in 4D-AIKit, you can reference a model with the syntax: {model:"ModelName"}, where ModelName is a valid model defined in the Model Aliases tab:
var $client:=cs.AIKit.OpenAI.new()
var $result := $client.chat.completions.create($messages; \
    {model: "Chat Model"})
Veja também
"Provider & Model Aliases" in the 4D AIKit documentation.