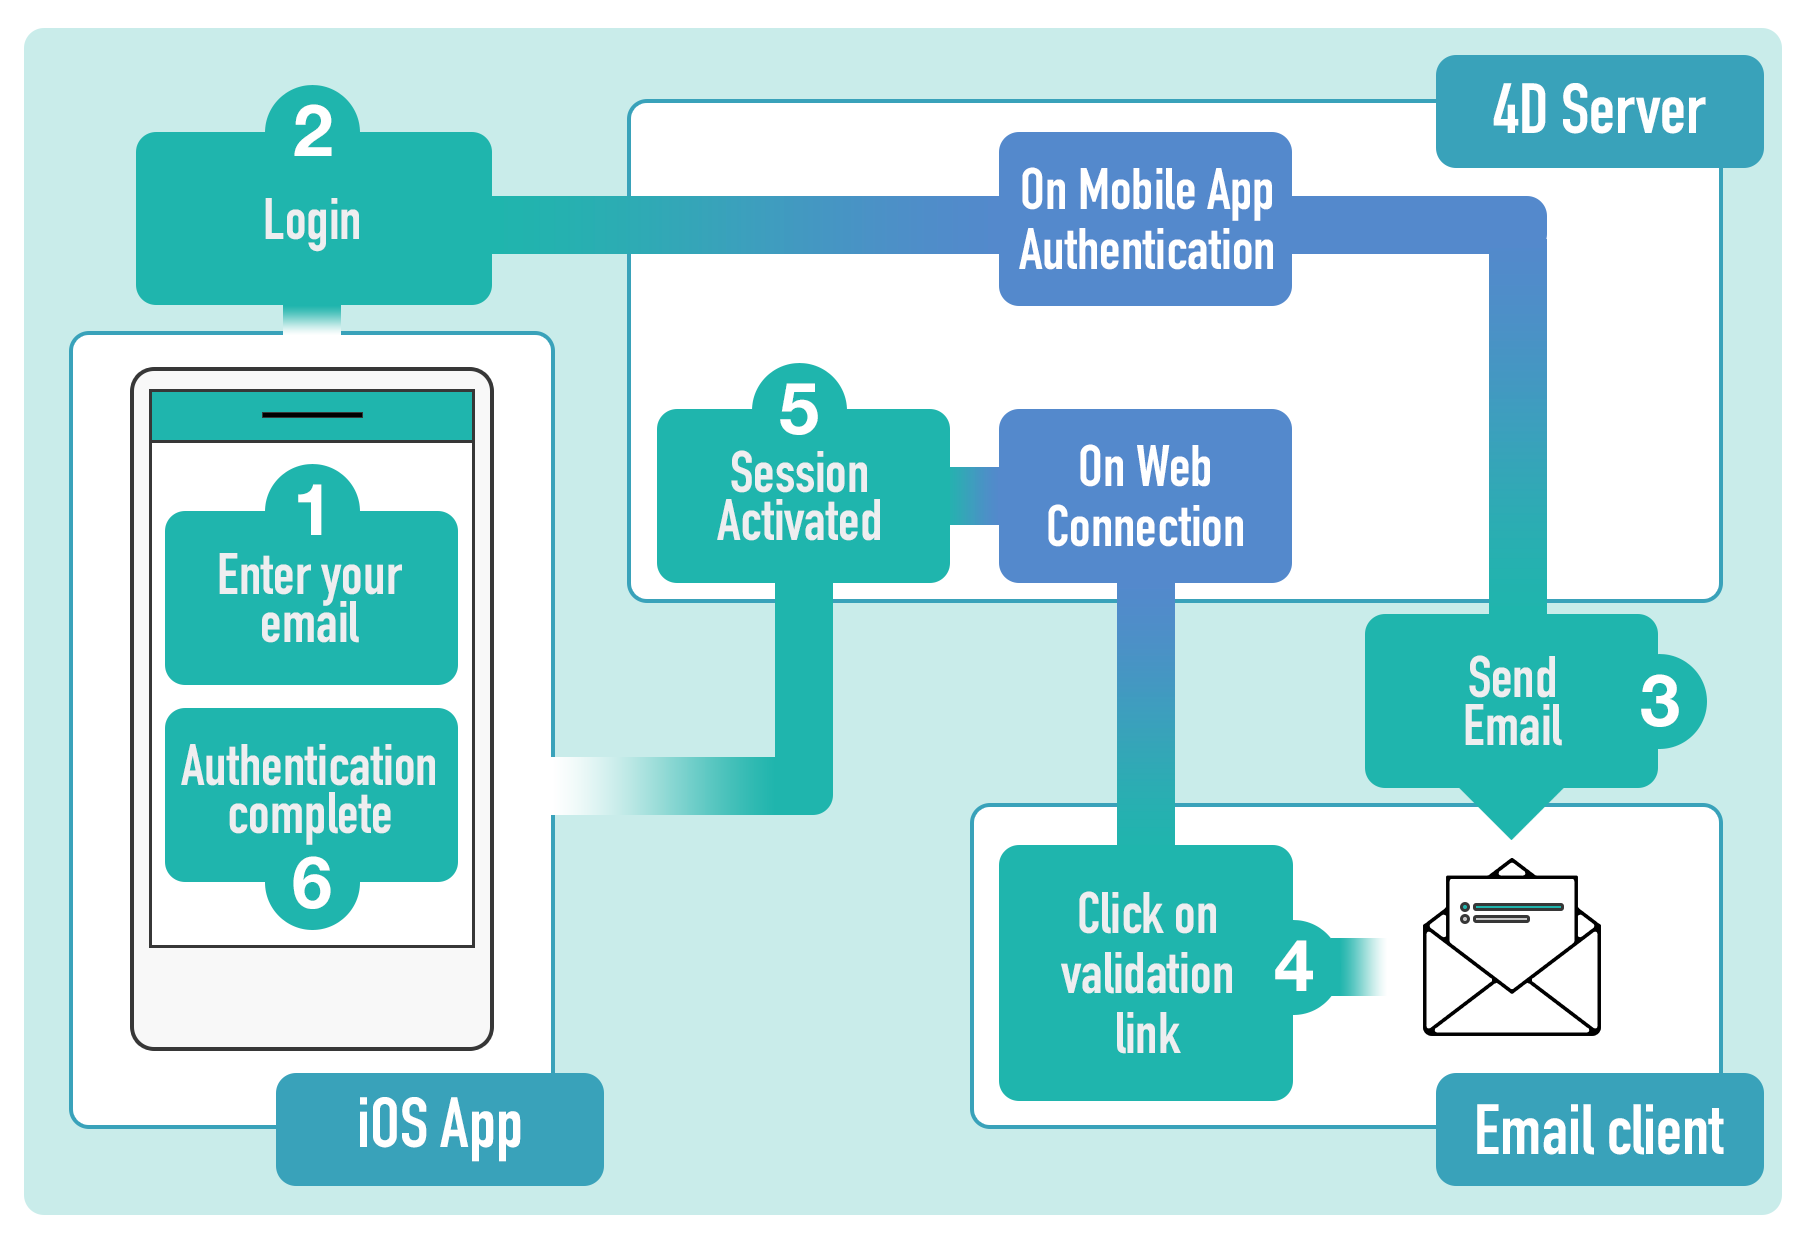
Email authentication example
This authentication example provides a way to verify that an email comes from whom it claims to be from, and will allow to block harmful or fraudulent uses of email.
Scenario
In short, the principle is the following:
1. Enable authentication
Select Authentication in the Publishing page to use a login form into your app. Select Authentication in the Publishing page to use a login form into your app.
2. Enter email address
An email is required when the app is launched. An email is required when the app is launched. A validation email is then sent to the user.
3. Check mailbox and 4. Click on the link
When the validation email is available, the user only needs to click on the validation link. This will call the On Web Connection database method and update the user's session status from "pending" to "accepted".
5. and 6. Back to the app
Once the validation is done, the user can reopen their app and click on the Login button. The On Mobile App Authentication method is called again but this time, the user's session status is "accepted", so the access is granted.
Here is a snapshot of the whole sequence:

You can handle this sequence using a special component, or manually.
Using the 4D Mobile App Server Component
The 4D Mobile App Server component is a toolbox component developed to help you manage several common mobile features. It provides methods for authenticate email logins.
- Call the
Mobile App Email Checkermethod from theOn Mobile App Authenticationdatabase method with the information provided by the mobile application:
// On Mobile App Authentication database method

#DECLARE ($mobileInfo : Object) -> $result : Object
$result:= Mobile App Email Checker($mobileInfo)
- Call the
Mobile App Active Sessionmethod from theOn Web Connectiondatabase method with theSessionID parameter retrieved from the URL:
// On Web Connection database method

#DECLARE ($info : Text)
Case of
: (Mobile App Active Session($info).success)
    //add log if you want
End case
It's as simple as that!
You will find more information in the Email Checker method documentation.
Without the Component
You can implement your own email authentication without using the 4D Mobile App Server component. Here a basic example:
- In the
On Mobile App Authenticationdatabase method, write the following code:
// On Mobile App Authentication database method

#DECLARE($request : Object)->$response : Object
var $mail;$status : Object

  // Create an email with an activation URL
$mail:=New object
$mail.from:="myapplication@gmail.com"
$mail.to:=$request.email  // email entered by the user on their smartphone
$mail.subject:="Login confirmation"
$mail.htmlBody:="<a href=\"https://myserverapplication/activation/"+$request.session.id \
+"\">Click Here to confirm your email.</a>\"<br>"

  // Send mail
$smtp:=New object("host";"smtp.gmail.com";"user";"myapplication@gmail.com";"password";"xxx")
$transporter:=SMTP New transporter($smtp)
$status:=$transporter.send($mail)

  // Configure response for the mobile app
$response:=New object

  // Declare that the current session is being verified
$response.verify:=True

  // Check if the email was successsfully sent
If ($status.success)
      //create a share object to contain our sessions, accessible from all processes
    If (Storage.pendingSessions=Null)
        Use (Storage)
            Storage.pendingSessions:=New shared object
        End use
    End if

    Use (Storage.pendingSessions)
          //Add a session to our session lists
        Storage.pendingSessions[$request.session.id]:=$request.team.id+"."+$request.application.id
    End use

    $response.success:=True
    $response.statusText:="Please check your mail box"
Else
      // Display an error message on the smatphone
    $response.statusText:="The mail is not sent please try again later"
    $response.success:=False
End if
- In the
On Web Connectiondatabase method, write some code to activate the session after the user clicked on the link in the confirmation email.
// On Web Connection database method

#DECLARE($url : Text; $header : Text; \
  $BrowserIP : Text; $ServerIP : Text; \
  $user : Text; $password : Text)

var $token ; $session : Text
var $sessionFile ; $sessionObject : Object

If ($url="/activation/@")
    $token:=Substring($1;13)
End if


  //get session from ID received from URL
If (Storage.pendingSessions#Null)
    $session:=Storage.pendingSessions[$token]
End if

If ($session#"")
      //get session folder
    $sessionFile:=Folder(fk mobileApps folder).folder($session).file($token)
    $sessionObject:=JSON Parse($sessionFile.getText())
      //update status value
    $sessionObject.status:="accepted"
    $sessionFile.setText(JSON Stringify($sessionObject))
    Use (Storage.pendingSessions)
          //delete pending session
        OB REMOVE(Storage.pendingSessions;$token)
    End use

    /*
        The MOBILE APP REFRESH SESSIONS command checks all mobile
        application session files located in the MobileApps folder of the server,
        and updates existing session contents in memory for any edited files.
    */

    MOBILE APP REFRESH SESSIONS

    WEB SEND TEXT("You are successfully authenticated")
Else
    WEB SEND TEXT("Invalid session")

End if
Remote url definition
By default, a remote server URL is defined in your Android app. In case the URL is not correct, the server will not be accessible. Therefore, to modify or update this URL, just make a long pressure on the icon in the login screen, or from the settings tab. Once you press the icon, a message is displayed with the remote url address and the server access status. You will then be able to edit the URL, authenticate successfully and access the server.
On iOS, you can edit the remote server URL from the iOS device Settings screen. You just need to check the "Reset server address" option to enter the correct server address.